Technical Tip
Use the Shift key to select several items in a row, or use the Ctrl key to select several items that are not sequential within the sales order.
Follow this procedure to make a payment on a sales order.
Refer to "Managing and Completing Orders".
|
|
|
Technical Tip Use the Shift key to select several items in a row, or use the Ctrl key to select several items that are not sequential within the sales order. |
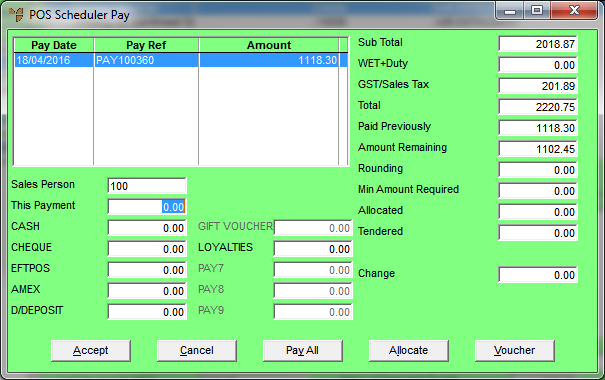
Micronet displays the POS Scheduler Pay screen.

This screen displays any previous payments made for this sale.
|
|
Field |
Value |
|---|---|---|
|
|
Sales Person |
Micronet displays the salesperson entered when the order was created. You can change this if required by entering your own salesperson ID, or by deleting the salesperson displayed and pressing Enter to select from a list. |
|
|
This Payment |
Enter the amount the customer is paying now. |
|
|
|
Technical Tip You can enter a $0 amount in the This Payment field to correct a payment method that was entered incorrectly. For example, if the original payment method was entered as CASH but it should have been EFTPOS, you can enter This Payment as $0, enter the CASH value as negative and the EFTPOS value as positive. |
|
|
Field |
Value |
|---|---|---|
|
|
Sales Person |
Micronet displays the salesperson entered when the order was created. You can change this if required by entering your own salesperson ID, or by deleting the salesperson displayed and pressing Enter to select from a list. |
|
|
This Payment |
Enter the amount the customer is paying now. |
|
|
[Payment Methods] |
If you want to pay the amount received from the customer against a single payment type, Tab to the field for the required payment type then select the Pay All button. Otherwise, enter the amount received from the customer against the appropriate payment type. You can dissect the amount across several payment types if required, e.g. if the customer pays partly by cash and partly by credit card. Options may include:
The payment types displayed are setup in your company configuration – see "Edit Company - Edit - Payment Types". |
|
|
Sub Total |
Micronet displays the subtotal of all lines on the order, excluding additional amounts such as freight, levies, surcharges and GST. |
|
|
WET+Duty |
Micronet displays any Wine Equalisation Tax that applies to items on the order (liquor industry items only), plus any duty or excise that applies to the order. |
|
|
GST/Sales Tax |
Micronet displays the amount of GST or sales tax applicable on the order. |
|
|
Total |
Micronet displays the order total, taking into account all additional amounts entered on this dialogue. |
|
|
Paid Previously |
Micronet displays the total amount of payments already paid against this order. |
|
|
Amount Remaining |
Micronet displays the current amount owing on the order. |
|
|
Rounding |
Micronet displays any rounding amount on the order total, e.g. if payments are rounded to the nearest 5 cents or 10 cents. Rounding is set in the Rounding on Payments field on the Invoicing Configuration screen – see "Edit - Program - Invoicing". |
|
|
Min Amount Required |
Micronet displays the minimum amount the customer must pay. |
|
|
Allocated |
Micronet displays any amounts allocated to finance companies – see "POS Scheduler Pay - Allocate". |
|
|
Tendered |
Micronet displays the total amount of the current payment entered against all payment types. When you have finished entering payment amounts, the amount in this field should equal the amount in the This Payment field. |
|
|
Change |
If the customer is paying by cash, Micronet displays any change owed. |
|
|
|
Technical Tip If the amount entered for a payment method exceeds the This Payment amount and the customer is an account customer, Micronet displays a message asking if you want to give change or update the debtors account.
Select one of the following options:
|
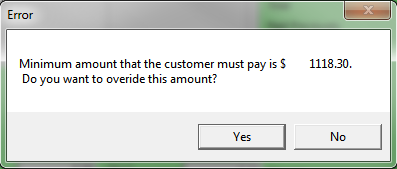
Micronet calculates the minimum deposit required for the order. This is based on the deposit percentages setup in your company configuration – see "Edit - Applications - POS - POS Enhanced".
If you have not entered the full amount, Micronet displays the following message.

|
|
|
Technical Tip You may need supervisor authorisation to override the minimum amount. |
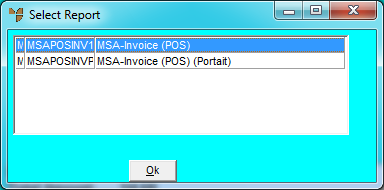
Micronet displays the Select Report screen with a list of report layout options created in the Report Generator.

Micronet displays the Select Output Device screen.
|
|
|
Reference For more details on these options, refer to "Selecting the Output for Inquiries and Reports". |
Micronet redisplays the Enter Transaction screen. If the payment has been finalised, it prints:
|
|
|
Technical Tip Items appearing on sales orders will appear as HELD items in the inventory files and will reduce the quantity Available displayed and reported for items. Actual On Hand quantities displayed reduce when the goods have been delivered or picked up and a tax invoice has been printed. |
If Micronet is configured to send invoices automatically in electronic DDO format (via the Inventory Configuration screen - refer to "Edit - Program - Invoicing"), Micronet opens a new email message in your default email program and attaches the electronic invoice to it. (If the invoice format belongs to the DDOINV group, the invoice will be attached in both PDF and DDO formats.) Enter the email recipient(s) and enter any message details before sending the invoice. You can resend the invoice if required using the Invoice Reprint program in MDS (refer to "Invoice Reprint - Edit - Recreate DDO Invoice Format" or "Invoice Reprint - Print - Recreate DDO Invoice Format (v2.8)").